Passive objects
Besides physical interaction and perception via cameras or depth sensors, passive objects in a simulation can be interacted with in several other ways.
For instance some objects can be set to be graspable by a robot (or a human), and specific sensors like the Semantic camera may provide extended information about a particular object, such as its type.
Creating passive objects
Passive objects are either plain, regular Blender objects, or a group of objects.
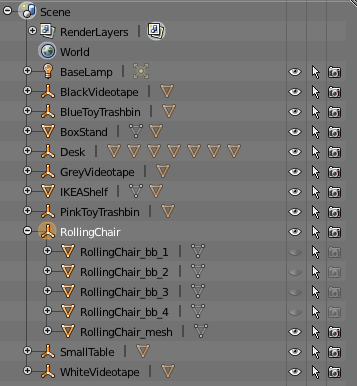
In the screenshot above (from
$MORSE/share/morse/data/props/objects.blend), the RollingChair
hierarchy is made up of an empty object (the RollingChair itself) and
five child objects (four for the bounding box, one for the actual mesh).
Since all these six Blender objects share the same prefix, they will be correctly imported together when using the MORSE Builder API.
When imported manually (from the Blender user interface), this eases the selection of relevant objects.
Note
You can also have a look at the tips on adding a bounding box around your objects.
For complex objects with non-trivial bounding-boxes, we recommend the creation of groups (which also has performance advantages, through group instances). To do this:
- Select all the objects that you want to group
- make sure they are properly centered on the Blender origin
- Press Ctrl+G to create a new group (they should appear in green in the viewport)
- In the outliner, select the Groups view. You can double-click on the group name to change it.
Passive objects properties
To be set as an interactive passive object, you only have to add the (Game)
property Object to the object, and to set this as boolean property
with the value True.
Other, optional, properties allow us to control other features of the object:
Label(String): the name (or label) of the object [1],Description(String): a longer description of the object [2],Type(String): the type of the object [3],Graspable(Boolean): if the object is graspable or not [4].
You can temporarly disable an object by simply setting its Object property to False.
| [1] | Used to display the object name in human’s manipulation mode and by the semantic camera sensor as ID of tracked objects. |
| [2] | Not used yet. |
| [3] | Used by the semantic camera sensor, defaults to Object. |
| [4] | Used by the human’s manipulation mode and the gripper actuators. |
Note
For the manipulation routines to work, the above properties (especially, Graspable)
must be set on the object holding the mesh you want to grab.
Importing passive objects with the MORSE Builder API
Passive objects can easily get added to a scenario defined with the MORSE Builder API.
The following example imports the SmallTable Blender object from the
props/objects.blend assets file, set some properties, and places it
in the scene:
from morse.builder import *

table = PassiveObject('props/objects', 'SmallTable')
table.setgraspable()
table.translate(x=3.5, y=-3, z=0)
table.rotate(z=0.2)
As with any other property, the game properties can be set using the following method:
table.properties(Object = True, Graspable = False, Label = "TABLE")
Warning
To set an object to be graspable, you must also call the setgraspable(..) function.
It adds an internal collision sensor to the object, required for pick and place
actions with the human avatar.
The next example shows how to add semi-randomly placed chairs in a scene:
import random
from morse.builder import *

# Add some randomly placed chairs
for i in range(3):
    chair = PassiveObject('props/objects', 'RollingChair')
    chair.translate(x=random.uniform(1.5, 7.0),
                    y=random.uniform(-5.0, 0.0),
                    z=0.0000)
    chair.rotate(z=random.uniform(0.0, 6.2)) # rotation in radians
Combining passive objects with switches
It is possible to create portable devices by combining switches with a passive object. The creation of such devices will be explained in terms of a flashlight.
First of all we need to create the mesh of our flashlight. After that
create the switch as a seperate object and make it a child of the mesh. Next
add a lamp object and again, make it a child of the mesh. Name all these
objects so that they all share the same prefix.
Now all that’s left is defining the single objects for the use with Morse.
So use the Morse Utils Addon to define the
switch. Add the Logic for the lamp using the Morse Light preset.
Disable the physics for the switch with the Ghost option in the Physics
Properties, so that there can’t be collisions with the mesh.
You can now import the flashlight using the MORSE Builder API
as explained above. You can also import it manually and set the mesh to be
a passive object using the Morse Utils.
Warning
If you use compound bounding boxes do not use the Compound
option on the switch object. Also do not make it a No Collision
object or otherwise you can’t use the switch.
The switch works exactly the same as a static one. Use the Left Mouse Button
to turn the device on and off. This also works while the object is carried.