ROS navigation tutorial ros
This tutorial shows how to use the ROS navigation stack to build a map and make your robot navigate in MORSE.
Note
All the scripts, nodes and launch files mentioned in this tutorial are
available in
$MORSE_PREFIX/share/morse/examples/tutorials/ros_navigation. If you
wish to directly reuse the ROS nodes, do not forget to add this path to
your $ROS_PACKAGE_PATH.
Prerequisites
You should be familiar with the basic usage of ROS and how to use TF and the ROS navigation stack. You should also know about launchfiles and topic remapping as well as the robot state publisher. Also experience with RVIZ is helpful. Tutorials on all of these topics can be found on http://www.ros.org/wiki/ROS/Tutorials.
We also assume you know how to use the MORSE Builder API to equip your robot with components. If not, please follow first the ROS and MORSE tutorial.
Environment setup
You need to have a working installation of ROS and also have the python3-compatible stacks for MORSE-ROS installed. You can find information about this in the installation notes
Note
This tutorial uses ROS Indigo. The tutorial has also been successfully tested with previous ROS versions down to ROS Fuerte. However, you may need to adapt some of the instructions if using a different ROS version.
If you are using Ubuntu, you can simply install the packages
ros-indigo-pr2-navigation, ros-indigo-pr2-common,
ros-indigo-control-msgs and ros-indigo-viz. They will install all
their required dependencies.
You also need MORSE installed with ROS support: check that the
BUILD_ROS_SUPPORT CMake option is enabled when building MORSE.
Bringing up your robot in RVIZ
Our first step is to get a robot to show up in RVIZ. In this tutorial, we will use the PR2 robot, but any robot (with an URDF file to describe it to RVIZ) will do.
Let’s create a first simple scenario script: a PR2 in a kitchen environment, a keyboard actuator to move it around, and an Odometry sensor to get some odometry feedback. First:
$ morse create nav_tutorial
$ cd nav_tutorial
And edit default.py:
from morse.builder import *

# Add a 'naked' PR2 robot to the scene
robot = BarePR2()
robot.translate(x=2.5, y=3.2, z=0.0)

# An odometry sensor to get odometry information
odometry = Odometry()
robot.append(odometry)
odometry.add_interface('ros', topic="/odom")

# Keyboard control
keyboard = Keyboard()
robot.append(keyboard)

# Set the environment
env = Environment('tum_kitchen/tum_kitchen')
env.set_camera_rotation([1.0470, 0, 0.7854])
Note
odometry.add_interface('ros', topic='/odom') tells MORSE to stream the
odometry information on the /odom topic, using the default
serialization method for the pair (odometry, ROS), as defined in Builder
data.py.
If you do not specify a topic name, one is created automatically (here,
it would be /robot/odometry).
If you like, you can also add an odometry.add_interface('socket') to add
another output on a socket.
Run it by first starting a ROS core (roscore) and then morse run
nav_tutorial.
Note
You can move the camera around with WASD + RF (up-down). To rotate it, press Ctrl while moving the mouse.
The odometry sensor automatically publishes the TF transformation between the
/odom and /base_footprint frames, so you actually do not need anything
more to display than the /base_footprint of your robot in RVIZ. Launch RVIZ
(rosrun rviz rviz), select /odom as Fixed frame, and add a TF
display. You should see the frames /odom and /base_footprint connected
together, on a black background. Move the robot within MORSE with the arrow
keys: the transform should update accordingly in RVIZ.
We will soon build and add a map, but in the meantime, we want to display the full robot TF tree (it is required by the ROS localization stack to know where the laser scanner is).
To do that, we need to publish the TF tree with the robot_state_publisher
module. This module takes the robot joint state (exported by the
armature_pose sensors of the arms, head and
torso in our case) and the URDF file of our robot as input.
First complete the default.py script by replacing the BarePR2 by the BasePR2:
from morse.builder import *
# Add a PR2 robot to the scene
robot = BasePR2()
robot.add_interface('ros')
robot.translate(x=2.5, y=3.2, z=0.0)
[...]
Note
The BasePR2 PR2 model has predefined actuators and sensors for the
arms, torso and head. These are needed to export the full robot joint
state. Check the PR2 Builder script source
to know how it is done, or read the PR2 documentation to know which other PR2 models are available.
Then, to make our lives easier, we create a new ROS package and a launch file that will
start the robot_state_publisher for us:
$ mkdir morse_2dnav && cd morse_2dnav
$ touch manifest.xml
$ touch nav.launch
$ export ROS_PACKAGE_PATH=$ROS_PACKAGE_PATH:`pwd`/..
Edit manifest.xml and copy and paste the code below:
<package>
<description brief="morse_2dnav">
morse_2dnav is a sample ROS node used to demo
2D planar navigation in the MORSE simulator.
</description>
<author>MORSE Team</author>
<license>BSD</license>
<review status="unreviewed" notes=""/>
<url>http://morse.openrobots.org</url>
<depend package="move_base"/>
<depend package="map_server"/>
<depend package="robot_state_publisher"/>
</package>
Edit nav.launch and copy and paste this code:
<launch>
<param name="robot_description" command="cat $(find morse_2dnav)/pr2.urdf"/>
<node name="robot_state_publisher" pkg="robot_state_publisher" type="state_publisher" />
</launch>
Lastly, build the pr2.urdf file in your node by running:
rosrun xacro xacro.py `rospack find pr2_description`/robots/pr2.urdf.xacro > pr2.urdf
Restart the MORSE simulation and launch your new ROS node with
roslaunch morse_2dnav nav.launch.
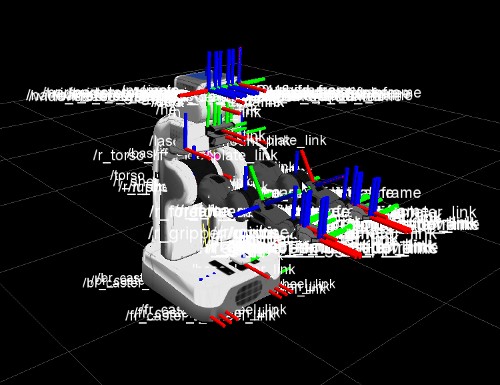
In RVIZ, set the Fixed frame to /odom. You should now see the full
PR2 TF tree.
Note
You can display the robot geometry by adding a Robot Model display in RVIZ.
Creating a map
The ROS navigation stacks include the powerful gmapping module that allows us to easily build 2D maps using SLAM techniques.
To do so, we first need to add a laser scanner to our PR2 model.
Edit default.py to add a SICK sensor, configured to approximate the PR2 Hokuyo laser scanners:
scan = Hokuyo()
scan.translate(x=0.275, z=0.252)
robot.append(scan)
scan.properties(Visible_arc = False)
scan.properties(laser_range = 30.0)
scan.properties(resolution = 1.0)
scan.properties(scan_window = 180.0)
scan.create_laser_arc()
scan.add_interface('ros', topic='/base_scan')
We can now build a first map of our environment. Restart the simulation with
morse run
nav_tutorial
.
Start your launch file: roslaunch morse_2dnav nav.launch.
You can now run the ROS GMapping stack:
rosrun gmapping slam_gmapping scan:=/base_scan _odom_frame:=/odom
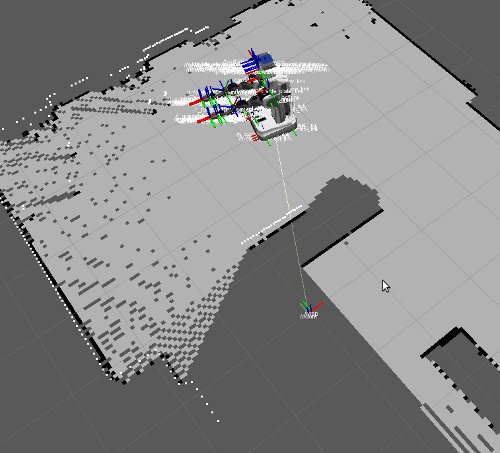
Move the robot around in the simulation using the keyboard to fill in the map (displayed in RVIZ).
When you are satisfied, save it with rosrun map_server map_saver.
This will create two files, map.pgm and map.yaml, in your home directory
that should be similar to the one provided with the tutorial in
$MORSE_PREFIX/share/morse/examples/tutorials/ros_navigation/maps/
Copy the map you have just recorded in your morse_2dnav node and add the
following line to your launch file to start a map server with your map:
<node name="map_server" pkg="map_server" type="map_server" args="$(find morse_2dnav)/map.yaml"/>
You do not need the gmapping node anymore; you can kill it.
Using ROS localization
The ROS navigation stacks provide a Monte-Carlo based module for localisation
estimation called amcl.
We can use it to localize our robot in the map.
Restart the simulation with the map server enabled.
Start the AMCL estimator, passing the laser scans topic as paramter:
$ rosrun amcl amcl scan:=/base_scan
Now, open RVIZ. Set the Fixed Frame to /map, enable the laser scan
display (topic name is /base_scan) to see the simulated laser scans and set
an initial pose estimate (i.e. an estimate of the pose of the robot in MORSE)
by clicking on the RVIZ interface’s 2D Pose Estimate button.
Now, move the robot in the simulator with the arrow keys. You should see the localization of the robot in RVIZ improving with time and displacements.
Navigating in the map
We can finally get the robot to autonomously navigate in our environment.
First, add AMCL to the launch file:
<node name="amcl" pkg="amcl" type="amcl">
    <remap from="/scan" to="/base_scan" />
</node>
Then, we need to add a motion controller to our robot. Open your default.py and add:
motion = MotionXYW()
motion.properties(ControlType = 'Position')
robot.append(motion)
motion.add_interface('ros', topic='/cmd_vel')
For the navigation, we will use the high-level move_base ROS module. The
2D Nav Goal button in RVIZ’s interface will allow us to easily send navigation
goals to our robot.
move_base requires numerous settings to be set. Visit
www.ros.org/wiki/move_base for details. The subdirectory morse_move_base
that you can find in
$MORSE_PREFIX/share/morse/examples/tutorials/ros_navigation/morse_2dnav
contains standard values for the parameters. Copy it to to your own ROS node,
and add the following new section to your nav.launch file:
<node pkg="move_base" type="move_base" respawn="false" name="move_base" output="screen" clear_params="true">

    <param name="footprint_padding" value="0.01" />
    <param name="controller_frequency" value="10.0" />
    <param name="controller_patience" value="100.0" />
    <param name="planner_frequency" value="2.0" />

    <rosparam file="$(find morse_2dnav)/morse_move_base/costmap_common_params.yaml" command="load" ns="global_costmap" />
    <rosparam file="$(find morse_2dnav)/morse_move_base/costmap_common_params.yaml" command="load" ns="local_costmap" />
    <rosparam file="$(find morse_2dnav)/morse_move_base/local_costmap_params.yaml" command="load" />
    <rosparam file="$(find morse_2dnav)/morse_move_base/global_costmap_params.yaml" command="load" />
    <param name="base_local_planner" value="dwa_local_planner/DWAPlannerROS" />
    <rosparam file="$(find morse_2dnav)/morse_move_base/dwa_planner_ros.yaml" command="load" />
</node>
Run your launch script with roslaunch morse_2dnav nav.launch. This should
bring up all needed nodes and topics.
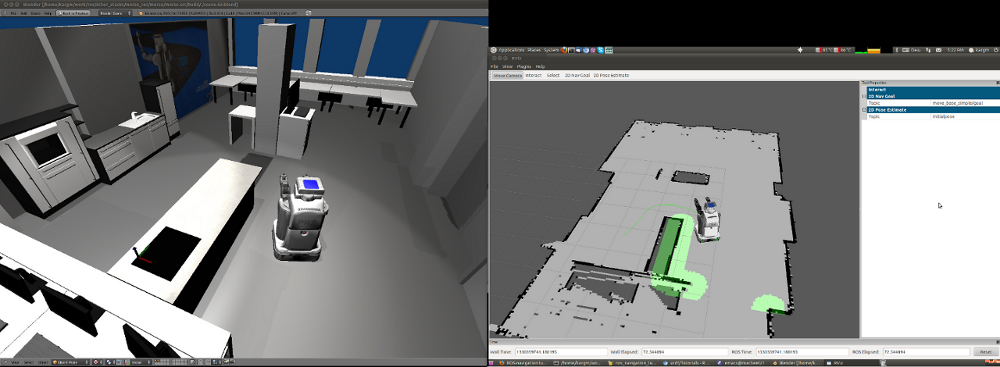
You can now set a navigation goal by clicking the 2D Nav Goal button. The robot should navigate towards that point on the map.
Note
You can add a display Path (with topic
/move_base/DWAPlannerROS/global_plan) to display the computed path in
RVIZ.
If everything worked out fine, it should look something like this: