Motion Capture HRI simulation
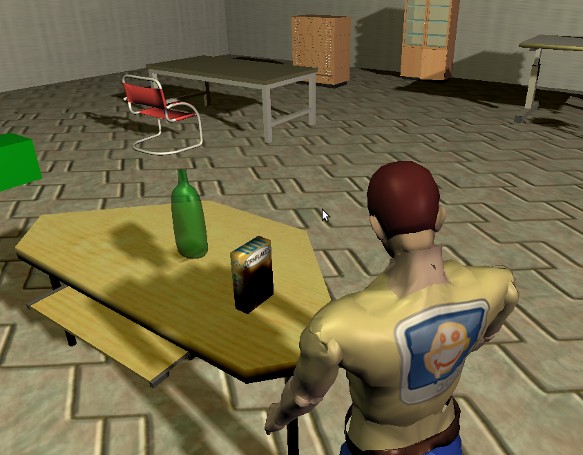
MORSE has a number of new components to allow a human user to control an avatar that can interact with the robot and some of the objects in the simulated environment.
Warning
This tutorial is currently oriented towards the experiments being carried out at LAAS for Human-Robot Interaction. They rely on the software packages of the Openrobots suite, and on the scripts available in the git repository
Pre-requisites
These features require a Microsoft Kinect or ASUS Xtion and a Nintendo Wiimote, to control the avatar.
To install requested modules, we will use robotpkg-wip suite. Once you got it, you will need to go to your robotpkg.conf (in $ROBOTPKG_BASE/etc) and to set the following variables:
PKG_DEFAULT_OPTIONS= python
PKG_OPTIONS.jointStateMapper = debug
PKG_OPTIONS.spark-genom = pr2
ACCEPTABLE_LICENSES+= pqp-license
ACCEPTABLE_LICENSES+= primesense-license
If for some reasons, you want to tell robotpkg to use your system’s module you can use this option:
prefer.mymodule = system
for more details see robotpkg documentation.
Then you need to install the module hri-simulation. We will use here robotpkg to install all required modules for us:
cd $ROBOTPKG_BASE/wip/hri-simulation
make update
This should install all the requested packages.
The data from the Kinect/Xtion is read using the niut module in robotpkg. If niut is not installed yet it can be installed following the usual instructions.
The Wiimote is used only to signal the simulation when we want to take an object, while moving around in front of the Kinect/Xtion. Being wireless, it allows for freedom of movement. We read input from this controller using Bluetooth, and the Cwiid package. Note that cwiid is also in robotpkg, in hardware repository. If you install cwiid from robotpkg, you may need to add $ROBOTPKG_BASE/lib/python2.6/site-packages to your $PYTHONPATH variable.
In this tutorial, we use Pocolibs as middleware. We assume you have a functional robotpkg installation with the necessary modules to control the Pr2 robot.
Setup the scene
The scripts necessary to run this simulation can be obtain from a git repository:
git clone git://trac.laas.fr/git/robots/hri-simulation.git
We use a Builder script to generate the scene with the Pr2 robot, a human avatar and some object that the robot can interact with. The script can be found in the directory hri-simulation/scripts, and is called hri.morse.mocap. Additionally, a Blender file is also available, which can display the names of the different camera views. This file is called hri_mocap_fullscreen.blend.
To launch the simulation you need first to launch NIUT module. To do so, open 3 new terminal. In the first one, we will launch Niut:
niut
You may have an error “Could not find h2 devices”. If so try to type:
h2 init
niut
If it is still not working, you may check that pocolibs is correctly installed on your computer and h2 is in your path. We remind you that pocolibs can be installed by using “make update” command in robotpkg/wip/genom3-pocolibs.
You may also have an error “error creating (...) File exists. If so you may want to kill the previous process with “killmymodules” command.
Once niut is running, launch a tcl server in a new terminal:
tclserv -c
In the 3rd and last terminal, launch eltclsh to start the Niut module:
eltclsh -package genom
Then in the eltclsh shell type:
connect
lm niut
niut::Init
At this point, depth lens should be activated (you should be able to see red light on your device).
Now you can launch your script hri.simulation.mocap that will launch MORSE.
Once MORSE is running, it is necessary to launch the helper program $MORSE_SOURCE/tools/wii_kinect_human_client.py, and press the buttons 1 and 2 on the Wiimote to make it discoverable. The 4 LEDs will start blinking, and when only the led to the left is left on, the Wiimote has been properly initialized. If all the LEDs turn off, you should relaunch the script and try again to get it detected.
To get detected by the Xtion, it is necessary to stand in front of it, at about 2 meters away, and raise your arms in the Psy position.
Controlling the human
Thanks to the Kinect/Xtion, the human avatar will emulate most of your movements, as long as you remain within the field of view of the sensor. The human is currently set to have no collisions, to avoid knocking down objects inadvertently. This could be changed in the future.
Hold the Wiimote on your right hand, and use only the right hand to interact with objects. When you want to pick up an object, place your hand close to it (inside the object works fine) and hold the B button on the Wiimote. As long as you keep the button pressed you will hold the object. If you release the button, the object will fall from your hand.
You can use the A button on the Wiimonte to change the camera view displayed in MORSE. In the current scene settings you can change between the default scene view, the robot camera view and a first person view from the perspective of the human. This last view can be useful to have a more immersive experience and allows more intuitive manipulation of the objects.
Picking objects
You can add object that both the robot and the avatar can interact with, following the instructions on passive objects.
For example, to add a corn flakes box into the scene, add the following lines to the hri.morse.mocap file:
# Import, configure and place a static object from 'kitchen_objects.blend'.
cornflakes = PassiveObject("props/kitchen_objects", "Cornflakes")
cornflakes.setgraspable()
cornflakes.properties(Label = "My cornflakes")
cornflakes.translate(-7, 3, 1.1)

